Morning Ladies,
I have a huge post coming today on my hectic weekend between The Make Up Fairy's Bday Bash on Friday and my first Bloggers Meet Up Saturday but before I go any further I have changed the name on my blog link.
The new link is www.masteringyourmakeup.blogspot.ie
I was a little too new to the blogging world that I didn't realise naming it after myself was not the best plan so to capture the essence of my blog I have changed the name yet still the official title will be "The Ordinary Girls Guide to Mastering her Makeup"
Thanks everyone :)
Stay beautiful,
Emma x
Monday, 2 December 2013
Friday, 29 November 2013
Inglot Masterclass Blanchardstown
Last night there was such a buzz about Blanchardstown shopping centre you can really tell Christmas is on the way. I had booked myself in for the masterclass in Inglot and was very excited to see manager Laura recreate a beautiful smokey eye on her stunning model Chloe.

You'll have to forgive my note taking, it was manic in the shop last night... it was the first night of the Christmas event in Blanchardstown so there was people everywhere!!
Laura began by showing us the finished look on half of Chloe's face and then she was to recreate it on the other side. Chloe already had her foundation on so the focus was on the eye make up.
 Cheeky little shot before we started :)
Laura began with applying;
A medium brown matte colour (395) all over lid with 6SS blending brush all over the lid and crease almost brining the colour to the brow bone.
Next she applied a warmer brown(391) (darker) all over lid. You can use the same 6SS brush for this and always use circular motions as this helps with blending the colour. You can bring this colour up to the crease but lightly.
Next you take a 19P brush which is a small blending brush and apply black eye shadow all over lid. This can create a small amount of loose product but don't worry about this you can sweep off any excess when you are finished the complete eye make up. Blend together with blending brush 6SS you used before. The most important element of creating a smokey eye is blending. using circular motions is best, there should be no harsh lines between the colours but you should still see the difference between them as you progress up you crease and close to your brow bone.
The real smokey element to this look is created using no.87 pigment and pat this onto lid using the 19P brush and blend very well. Pigments almost always guarantee fall off but this can be taken care of easily.
Black gel liner was then applied to the bottom lash line using the 23T brush. Laura gave us the tip to get your client to look the opposite way of brush to help keep them relaxed. Half way through, ask them to look the other way when lining the bottom lash line.
Don't worry about being messy with the liner here as you'll smudge it out with a 22T brush. This is a concealer brush but is great for blending out the liner into under eye blending liner downwards.
You can then go back in with pigment (used on the lid) under the eye to smudge the look even more.
*Another great tip from Laura was night was you can use a cotton bud to blend away any excess you may have created.
To warm up the under eye you can very lightly go back in with the 6SS brush using the 609 warmer brown colour under eye.
Back to the top of the eye then; Taking the 23T line top of eye. As your client to look straight ahead and flick the liner out and towards the brow bone. Starting at the end of the flick, fill the line back in (working from the outside in)
When applying liner to another person, they can sometimes get very nervous if they see the liner brush coming for them so a tip to avoid this is ask your client to look down and to the outside of their body to get the inner corner of eye and then change as you move across the eye.
For dramatic looks use duo glue in black so you don't have to worry about white marks from the glue on the black liner.
*Another tip: Ask your client to look down at their knees when applying lashes so they are distracted but you can make sure they are applied right. Remember to press the false lashes down to sit on the natural lashes.
You can then go back in with the 6SS brush and blend colours on crease almost to brow bone.
Taking a clean fluffy brush, you can now clean off excess pigment/shadow which may have fallen onto your cheeks.

Onto the face:


You'll have to forgive my note taking, it was manic in the shop last night... it was the first night of the Christmas event in Blanchardstown so there was people everywhere!!
Laura began by showing us the finished look on half of Chloe's face and then she was to recreate it on the other side. Chloe already had her foundation on so the focus was on the eye make up.
 Cheeky little shot before we started :)
Laura began with applying;
A medium brown matte colour (395) all over lid with 6SS blending brush all over the lid and crease almost brining the colour to the brow bone.
Next she applied a warmer brown(391) (darker) all over lid. You can use the same 6SS brush for this and always use circular motions as this helps with blending the colour. You can bring this colour up to the crease but lightly.
Next you take a 19P brush which is a small blending brush and apply black eye shadow all over lid. This can create a small amount of loose product but don't worry about this you can sweep off any excess when you are finished the complete eye make up. Blend together with blending brush 6SS you used before. The most important element of creating a smokey eye is blending. using circular motions is best, there should be no harsh lines between the colours but you should still see the difference between them as you progress up you crease and close to your brow bone.
The real smokey element to this look is created using no.87 pigment and pat this onto lid using the 19P brush and blend very well. Pigments almost always guarantee fall off but this can be taken care of easily.
Black gel liner was then applied to the bottom lash line using the 23T brush. Laura gave us the tip to get your client to look the opposite way of brush to help keep them relaxed. Half way through, ask them to look the other way when lining the bottom lash line.
Don't worry about being messy with the liner here as you'll smudge it out with a 22T brush. This is a concealer brush but is great for blending out the liner into under eye blending liner downwards.
You can then go back in with pigment (used on the lid) under the eye to smudge the look even more.
*Another great tip from Laura was night was you can use a cotton bud to blend away any excess you may have created.
To warm up the under eye you can very lightly go back in with the 6SS brush using the 609 warmer brown colour under eye.
Back to the top of the eye then; Taking the 23T line top of eye. As your client to look straight ahead and flick the liner out and towards the brow bone. Starting at the end of the flick, fill the line back in (working from the outside in)
When applying liner to another person, they can sometimes get very nervous if they see the liner brush coming for them so a tip to avoid this is ask your client to look down and to the outside of their body to get the inner corner of eye and then change as you move across the eye.
After you have applied your liner it is now time to add your lashes. For this look Laura chose lashes 76S for a bigger fuller eye. Chloe had beautiful big eyes and quite full lashes herself. A trick is to measure the shape of the eye when choosing lashes, always start in the middle n cut from there.
For dramatic looks use duo glue in black so you don't have to worry about white marks from the glue on the black liner.
*Another tip: Ask your client to look down at their knees when applying lashes so they are distracted but you can make sure they are applied right. Remember to press the false lashes down to sit on the natural lashes.
You can then go back in with the 6SS brush and blend colours on crease almost to brow bone.
Taking a clean fluffy brush, you can now clean off excess pigment/shadow which may have fallen onto your cheeks.

Onto the face:
Use a lighter concealer to highlight the look. This can lighten the eye area after you have applied such dark colours on the eye. Pat on concealer no.95 with your finger.
Pressed powder in 42 was used to create a small glow, this powder was slightly lighter than foundation and patted onto the face lightly.
Next Laura took their new Hd illuminating powder no.45 was patted all over face. This created a beautiful glow all over Chloe's face and really set off the festive party look.
Next a contour powder in 45 was used to contour the hollow of the cheek. This runs from the top of ear to outer corner of eye. You only need to lightly brush in straight line and be sure to blend out. We all know how much I love to contour but I just struggle to get the balance right to look like I have anything on to looks like there's way too much on. Once the hollow of the cheek is done you can then work the powder up into temple.
Blush for this look is quite subtle and for this look, no.32 blush was applied using circle motions on the Apple of the cheeks. You need to have the cheesy smile on your face to be sure you are applying your blush in the right place.
Now as we all know Christmas is the one time of year when glitter is completely acceptable and this highlighting sparkle dust no.2 is perfect. This is a must on my Christmas list now. You need only a tiny bit of this on your brush. Be sure to tap off the brush on the back of your hand and then very gently, pat onto cheek bone n temple. You will be a sparkly goddess now.
Now as we all know Christmas is the one time of year when glitter is completely acceptable and this highlighting sparkle dust no.2 is perfect. This is a must on my Christmas list now. You need only a tiny bit of this on your brush. Be sure to tap off the brush on the back of your hand and then very gently, pat onto cheek bone n temple. You will be a sparkly goddess now.
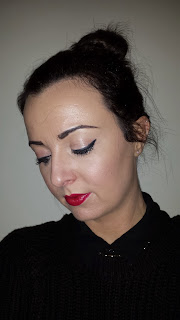
The lipstick used was slim gel 62. This is not a conventional red colour but very festive and really set off the smokey look on Chloe. You can apply this with small lip brush.
Finally to complete your look, Highlight in brown bone using 395, pat in with finger but not into dark section.

Chloe was a beautiful model and Laura was a fantastic teacher. She always made sure that we could see and could follow her instruction easily. She was kind enough to even take a call from me this morning just to run over some of the brushes to make sure I have the right details. Below now is the product list used for this look. You can call in to Inglot Blanchardstown and ask any questions you have about this look. The girls who work there are so helpful and I am a big lover of the brand. Much easier to purchase now that I made the move to Dublin :) I am attending Liffey Valley Inglot next week so will bring you a full post on that look after it. Thanks again to Laura and Chloe for a great masterclass.

Stay beautiful,
Emma x
Facebook: Emma Sheehan Blog https://www.facebook.com/emmajcsheehanblog?ref=hl
Twitter: @emmajcsheehan
Instagram: emmalvsapose 'Emma Sheehan'
Tuesday, 26 November 2013
Creating a Vintage (type) Look
Good morning ladies,
Firstly I say 'type' look because I cannot say for sure that what I class as vintage is in fact right as I'm not a Make Up Artist myself, but I have kept an eye on the trends and this seems to be everywhere!
Black winged eye liner and red lips!!!
To set off this look I find having a strong brow can really enhance the liner lip look.
Eye liner can be tricky business at the best of times, with many ways to apply it; pencil, gel, liquid and even markers.
I personally use either a gel or liquid on my top line and a pencil on my bottom waterline.


To begin to create a good flick you need to firstly accept this takes time, I say this because for ages I thought the only way to create a flick was to do it all in one sweeping motion and then I wondered why it always looked so messy!
*If you are using a gel and a brush, apply some of the gel to the back of your hand and dip your brush in. There are two types of brush I use, a pointed liner brush and a slanted liner brush. Sometimes I would find the pointed brush easier*
The first step is to apply liner to the center of your lid. The inside of your eye should always have the thinnest liner and then the line should get thicker as you move towards the outer corner of your eye.
The second step is to fill the inner corner of your eye. Try keep as close to the lash line as possible here to keep it nice and thin. (This can be difficult with liquid sometimes it ends up in my eyeball which is quite painful)
Next apply liner to the outer corner of your eye getting thicker as you move out. If using a brush of any kind, take your time, little by little.
You may need to stretch your eye out to create the flick. Hold your skin out towards your temple and follow the brush movement upwards. This may look odd at the start as it does not join the corner of your eye but this is ok as you will join it together in the next step.
You fill in the gap by creating a triangle and filling it in. The triangle should go from the outer corner of your eye pointing upwards towards your brow and meeting the thicker outer liner on top of your lash line.
A further option is to smooth out the line with black eye shadow on an angle brush if you want it looking nice and even.
For your bottom lashes, I usually use a pencil and lightly apply it to the lash line for this look rather than the waterline.
Adding lashes and mascara finishes off the beautiful 'cat eye' look.
Brows are defined as described before in my Eyerebrushed lesson, filling in the bottom line of the brows first, followed by the top and then working into the gaps. You only apply lightly to existing hair to keep the colour consistent but if you want to create the HD look, be sure to edge off the inner corners of the brow into an almost square look.
Applying lip pencil should always be carried out with a sharp lip pencil. Working from the outside in, lightly apply the liner taking extra care when working on the cupids bow. If you have thinner lips and would like them to look fuller, you can add liner to the top of your lips and then when you apply lipstick, your lips will appear fuller.
Lipstick again should be applied using a small lip brush, using a 'bullet' as they are called, can smudge and ruin all the effort you put in with your pencil so be careful to apply little by little but ensuring to apply right into the corners of your lips so you don't look silly when you smile :)
When creating a vintage look, I love using my MAC Russian Red lippy but another great colour is the Catrice My Red Card.
A light contour/highlight and blush can be applied when creating a vintage look but they real focus on your face should be your brows, liner and lips.
Hope this helps, I'll be sure to post a step by step pic soon and you can all be vintage fab this Christmas. My own pics this morning I tried using a pencil.... not as easy so I think its back to gel for me :)

Stay beautiful,
Emma x
Firstly I say 'type' look because I cannot say for sure that what I class as vintage is in fact right as I'm not a Make Up Artist myself, but I have kept an eye on the trends and this seems to be everywhere!
Black winged eye liner and red lips!!!
To set off this look I find having a strong brow can really enhance the liner lip look.
Eye liner can be tricky business at the best of times, with many ways to apply it; pencil, gel, liquid and even markers.
I personally use either a gel or liquid on my top line and a pencil on my bottom waterline.


To begin to create a good flick you need to firstly accept this takes time, I say this because for ages I thought the only way to create a flick was to do it all in one sweeping motion and then I wondered why it always looked so messy!
*If you are using a gel and a brush, apply some of the gel to the back of your hand and dip your brush in. There are two types of brush I use, a pointed liner brush and a slanted liner brush. Sometimes I would find the pointed brush easier*
The first step is to apply liner to the center of your lid. The inside of your eye should always have the thinnest liner and then the line should get thicker as you move towards the outer corner of your eye.
The second step is to fill the inner corner of your eye. Try keep as close to the lash line as possible here to keep it nice and thin. (This can be difficult with liquid sometimes it ends up in my eyeball which is quite painful)
Next apply liner to the outer corner of your eye getting thicker as you move out. If using a brush of any kind, take your time, little by little.
You may need to stretch your eye out to create the flick. Hold your skin out towards your temple and follow the brush movement upwards. This may look odd at the start as it does not join the corner of your eye but this is ok as you will join it together in the next step.
You fill in the gap by creating a triangle and filling it in. The triangle should go from the outer corner of your eye pointing upwards towards your brow and meeting the thicker outer liner on top of your lash line.
A further option is to smooth out the line with black eye shadow on an angle brush if you want it looking nice and even.
For your bottom lashes, I usually use a pencil and lightly apply it to the lash line for this look rather than the waterline.
Adding lashes and mascara finishes off the beautiful 'cat eye' look.
Brows are defined as described before in my Eyerebrushed lesson, filling in the bottom line of the brows first, followed by the top and then working into the gaps. You only apply lightly to existing hair to keep the colour consistent but if you want to create the HD look, be sure to edge off the inner corners of the brow into an almost square look.
Applying lip pencil should always be carried out with a sharp lip pencil. Working from the outside in, lightly apply the liner taking extra care when working on the cupids bow. If you have thinner lips and would like them to look fuller, you can add liner to the top of your lips and then when you apply lipstick, your lips will appear fuller.
Lipstick again should be applied using a small lip brush, using a 'bullet' as they are called, can smudge and ruin all the effort you put in with your pencil so be careful to apply little by little but ensuring to apply right into the corners of your lips so you don't look silly when you smile :)
When creating a vintage look, I love using my MAC Russian Red lippy but another great colour is the Catrice My Red Card.
A light contour/highlight and blush can be applied when creating a vintage look but they real focus on your face should be your brows, liner and lips.
Hope this helps, I'll be sure to post a step by step pic soon and you can all be vintage fab this Christmas. My own pics this morning I tried using a pencil.... not as easy so I think its back to gel for me :)


Stay beautiful,
Emma x
Friday, 22 November 2013
Creating A Beautiful Smokey Eye (Step by Step)
I think from all my make up lessons, between contouring and creating smokey eyes practice really is key. I have tried a few times to create the great smokey eyes MUA's like Maisy in La Beaute create but I am a long way off that. Unfortunately my laptop is still in the shop so I am creating this post off my ipad so I don't have pics but I will be sure to post lots of pics once I get my laptop back.
Step by step smokey eye:
To create a smokey eye, choose four colour; Base colour for the crease, darker edge colour which will also be added to the crease, a lid colour and the darkest colour for the outside of the eye.
Step by step smokey eye:
To create a smokey eye, choose four colour; Base colour for the crease, darker edge colour which will also be added to the crease, a lid colour and the darkest colour for the outside of the eye.
Brushes you will need to create this look:
Flat Shadow Brush
Clean Fluffy Blending Brush
Small Smudger Brush
Shadow: Start with
the crease- apply the base crease colour with a shadow brush. Blend Blend
Blend... using this blending to move the crease colour a little higher towards
the arch of your brow.
*a shadow brush applies colour but you need blending brushes
separately*
Next apply the darker colour into a V shape at the side of
the eye, blend this from the V into the crease but not higher than that and not
to take over the crease base colour. Shadows should flow gradually into each
other. Next to apply the lid colour, take a different brush and apply the
brighter lid colour all over until it meets the V colour and the crease. Blend
this lid colour in using a clean brush but do keep it defined. The last colour
to use is to be applied to the outter corner which again is put on the eye
using a V shape and blended very well so that the colour appears to run into
each other easily.
Eye liner: Apply a line of gel eye liner with the outside
edge becoming thicker. To make a cat eye, apply the liner on the bottom tear
line including the lash line and bring the line out and up to meet the shadow.
Fill back in the gel liner to meet the top line of the eye creating a triangle.
Then apply some liner into the crease and blend using the crease blending brush
to really darken and define the crease.
Lashes: Apply false lashes in whichever way is easiest for
you. Some people use a tweezers, I personally tend to look half down and
balance the lashes onto my own. Before you begin to apply lashes be sure to
measure them to your lash line. Cut them is necessary and then bend them a few
times to ensure they are not stiff. This makes them much easier to apply. Apply
mascara to both the top and bottom lashes. Squeeze your own lashes and the false
lashes together with either your fingers or an eye lash curler so they look
like one.
This is a step by step guide I had from my one to one lesson with Maisy.
I have also started to watch youtube tutorials to help me with the smokey eye look and one person who I always seem to come back to is Lauren Curtis. She is fantastic and although makes it look very easy, she really does take it step by step for you to get it right.
Here I have chosen her red mahogny video for you to see just how simple she makes creating a fantastic look:
http://www.youtube.com/watch?v=x7ESgz2X_sc
Firstly apply a red shadow (she lists all her products in the video) all over the lid with your finger then blend up and into the crease with a fluffy blending brush.
Using a short smudger brush, thickly apply this colour to the bottom lash line.
As you are blending up into the crease create a V shape of shadow out the outter edge of your eye.
Apply the darker red colour onto the lid with your finger first, then with a blending brush blend into the crese and all over the lid.
Add the new darker colour to the bottom lash line with a smudger brush again.
Add pencil eye liner roughly to the top and bottom lash line and using the smudger from before bend blend blend the liner into the lash lines.
Go back in with your pencil liner into the waterline to create definition.
As you were blending the liner, be sure to blend it into the outter corner of the eye into that V shape.
Using a white highlighting shade on a shadow brush, highlight the brow bone.
Add mascara and lashes!!
I love this look as I feel it is very festive and does not seem to be too intensive for us non experts!
I found this pop of colour video last night and I really hope to create something similar this weekend so if it works out I will deffo get a pic up :)
http://www.youtube.com/watch?v=aODHce3Bi00
Another person I love to watch on YouTube is Nicole Guerriero. She is american and posts fantastic videos!
http://www.youtube.com/watch?v=8rH0Kg49atM&feature=c4-overview&list=UUz0Qnv6KczUe3NH1wnpmqhA
If you know of any other fab youtubers to watch please do let me know.
Stay beautiful,
Emma x
Emma Sheehan Blog on Facebook: https://www.facebook.com/emmajcsheehanblog
Twitter: @emmajcsheehan
Instagram: Emma Sheehan emmalvsapose
Monday, 18 November 2013
Cleaning Your Brushes.
Apologies ladies my laptop is sick I have no pics :(
Brushes are key to creating beautiful make up looks and I have mentioned a range of brushes in previous posts. My go to brushes are the real techniques brushes but also since my fantastic win from The Make Up Crew Dublin, I have been using my new brushes loads and I love them!
Brushes are key to creating beautiful make up looks and I have mentioned a range of brushes in previous posts. My go to brushes are the real techniques brushes but also since my fantastic win from The Make Up Crew Dublin, I have been using my new brushes loads and I love them!
Before embarking on this blog, I have to admit I was very
bad at taking care of my make up brushes. For the most part, my make up routine
was so poor I rarely used brushes so now that I have them and want them to
last, I am finally taking care of them like I should.
From reading posts from other bloggers, tweeting asking
questions and also watching YouTube tutorials, you soon learn there are many
ways to clean your brushes.
For me, I started to use baby shampoo and warm (not hot)
water. The reason you do not want to use hot water on the brush is because you
risk melting the glue which holds your brush together. You could end up with a
brush in pieces and that’s a tragedy no girl wants to have.
So taking your brush, hold it upside-down with the bristles
facing down into the sink and run the water on the brush hair only. Put some
baby shampoo on your hand and swirl the brush around on your hand taking most
of the makeup off it.
After this step rinse the brush again, squeezing out the
excess make up.
Depending on which brush you are cleaning you may need to
repeat the shampoo step.
Foundation brushes can sometimes be the hardest
brushes to clean.
When you are sure the brush is now clean, squeeze out as
much of the water as you can from the brush head but do take care not to pull
hard on the brush as you may have loosened up some of the glue while cleaning.
Fold a towel into a third of its size so it creates a shelf
for the brushes to dry on.
Taking your clean brush, dry it against the towel. You need
to be very careful not to lose the shape of the brush so mould it with your
hands before leaving it to dry.
*I recently saw on YouTube, you can buy mesh nets for drying
brushes which hold their shape and still allow enough air through the hair to
dry the brush properly. I have since found them on EBay for €2 so will be using
them once they get here to save my brushes.*
The shelf that you have created with the towel will help
stop the brushes drying with one flat side so place all your clean brushes with
the hairs hanging off the edge of the towel, in a warm place overnight until
they are fully dry. I left mine in my bedroom under the radiator so it was warm
but not hot enough to melt the glue.
Do take care of your brushes ladies, they are a great investment
and will last a lot longer if you take care of them.
If anyone has any other suggestions or advice on how to clean makeup brushes, I'd love to hear from you.
Follow me on Bloglovin: emmajcsheehan.blogspot.ie
Twitter: @emmajcsheehan
Instagram: emmalvsapose
Stay beautiful,
Emma x
Buying the Essentials
Just a quick Monday post on some mega saving I made
yesterday. Apologies for the lack of pictures my laptop is unwell again and I can't seem to load them from the ipad :(
It can sometimes cost you an arm and a leg when you run out
of all your beauty essentials. This used to happen to me, all of a sudden I’d
be out of about five things at the same time and this weekend was no different.
I needed to get some new baby shampoo to clean my brushes,
cotton ear buds, inter-dental toothbrushes,nail varnish remover, razors and conditioner. I went to Boots first
as it was the closest place to me and usually I like Boots because they always
have some sort of offer on but unfortunately I was out of luck this week. Trying
to work out how much all I needed would cost me was around €20 so as there is a
Tesco and Dealz in the same complex, I thought why not try them.
Tesco was excellent!! I got my baby shampoo for 86c, my cotton
ear buds for 65c, inter-dental toothbrushes for €2.20. Serious savings compared
to Boots on that occasion.
I then went to Dealz and again as we all know already Dealz
is bargain central. My conditioner was €1.49, my nail varnish remover €1.49,
Razors €1.49.
In total I saved over €10 by just trying a different shop.
Sometimes you can be so lucky when you want to get a few bits so keep an eye
out for offers and treat yourself always.
Stay beautiful,
Emma x
Friday, 15 November 2013
Competition Wins.... Spoiled Rotten!!
Ladies....
Facebook and Twitter can be littered with 'Like and Share' and 'Follow and Retweet' competitions but ladies... It is so worth entering, over the last few months I have been blessed with winning!
It was from entering so many competitions myself that I decided it was time for my Facebook blog page to have it's very first competition. I can now understand just how difficult it can be to find a winner, the list of names I had to put into a bowl was ridiculous but I really wanted it to be fair. I even enlisted the help of my mum as my beautiful assistant to help draw the name. A big should out to my fab winner Aoife Daly who has had her beautiful Fuschia Make Up palette sent to her in the post. I'm sure she will love it as much as I do.
I wanted to write this post on my wins, not to brag but to genuinely thank all of the companies and people who run the competitions and give away such amazing prizes.
The first prize I want to talk about was my win from MakeUp Waterford. This is freelance MUA Sinead Sullivan. Sinead had posted a like and share competition to win an ArtDeco blush set. She had been sent two and because she loved it so much she decided to do a little give-away which I was lucky enough to win. For Sinead's comp you just had to comment under the picture of the set. She then chose 5 names at random and posted them onto her page and the first person to get back to her won the set. It came in a beautiful gift box with a blush and brush. I had never tried ArtDeco before so was very excited to receive the set. I am totally in love with it. There are three different colours in the palette so you can mix and match which one you would like to wear. The brush is colour co-ordinated with the blush box so it's extremely pretty. If you have someone who likes their blush, I would highly recommend this set as a Christmas present.


You can link in with Sinead for makeup applications or lessons on:
www.makeupwaterford.com
Facebook: MakeUp Waterford
Twitter: @MakeupWaterford
The second prize I want to write about is from the amazing The Make Up Crew. This is an agency based in Dublin who provide courses in Make-Up artistry with some of Ireland's best Freelance Artists available. This competition had a huge prize. Again it was on Facebook and the competition was a like share and comment. This prize was a massive 12 piece brush set but not just one but three sets were up for grabs. I have two beautiful younger sisters, Amy and Kate, both 22 (yep they're twins) who also have a love of makeup although I wasn't sure they had the right tools. Brushes can be quite expensive, although we know I have a huge love for real techniques, I couldn't help but really want to win this comp for me and the twins. The 12 piece brush set looked amazing and from using it myself over the last few days, I am in love!! Each and every day I shared The Make Up Crew's facebook page on both my personal page and my blog page and left a comment. It became a little obsession for me over the week but I could not believe how good this prize was I was a determined monkey to win. To my absolute delight, I won the three brush sets and myself and the twins were over the moon. From speaking to the twins, they are in love with the set and getting great use out of them. Thanks to The Make Up Crew, I am now attending their master class day on December 14th in Dublin and my guest is my mum. She's so excited to see how a master class works and learn some new skills for herself. After my class I will of course have a full blog post sharing what I learned so keep an eye out for that in December. Now that I have made the big move to Dublin, I am hoping with a little saving next year I shall embark on a make up course and move further into my love of all things make up.

You can check out the fantastic Make Up Crew on:
www.themakeupcrew.ie
Facebook: The Make Up Crew
Twitter: @THEMAKEUPCREW
Instagram: themakeupcrew
The third prize only arrived this morning and I am so excited to play with all my new treats. This amazing package arrived at my new home in Dublin and I couldn't wait to see what was inside. This prize was from Martina Curran from CelticBeauty. Martina is a beauty blogger from Ireland who runs the amazing blog martinacurran19.blogspot.ie. Martina posted a competition on her own blog page as she had reached a new number of followers. I had just discovered Martina's blog and loved it so chanced entering. The blog is full of beauty reviews and I especially love the Mani Monday section. The prize pack was huge... a make up bag full of new products which I haven't tried before so I can't wait to test them all out. I have already used the Rimmel Wake Me Up shimmer touch in 'shimmering sand' and I love it. I feel all glitzy and warm this freezing Friday. As part of my blogging, I am constantly trying to link in with other bloggers, get ideas from them on what I should blog about and maybe even products to try myself so if you are looking for extra reads please check out Martina's blog.

You can read all about it on:
martinacurran19.blogspot.ie
Twitter: @celticbeauty1
I love competitions but I must try refrain from entering them all as they can take over your life! I am so grateful to all of the above companies/people for the amazing prizes and also the wonderful correspondence I have received from each of them. I am hoping to do another give away from my own blog before Christmas so keep you eyes peeled.
Stay beautiful,
Emma x
Follow me on facebook: https://www.facebook.com/emmajcsheehanblog
Twitter: @emmajcsheehan
Instagram: emmalvsapose
Thursday, 31 October 2013
Lipstick... A Brilliant Way To Glam Up Every Look
As many of my friends will know lipstick is absolutely my favourite part of make up. Many people could not live without Mascara or Eye Liner but me.. I'm all about my lips.


 Some other brands which I love for lipsticks are once again Catrice. So far I have three colours, a pink (Frozen Rose), a nude (Be Natural) and a red (My Red Card) and I love them all. They are high shine, moisturising and great value at only 5.99.


I have been told in MAC that I have a smashing cupids bow, I had to laugh but she is the expert so I'll believe her :) If you want to have statement make up look, using a bold colour such as a deep red, bright pink or berry purple can really make you stand out. My favourite MAC colours are; Russian Red, Heroine, Candy Yum-Yum and Rebel.

I buy a lot of MAC colours because so far they have had the best staying power for me. If I can afford to get one each couple of months I always do, trying to build up a rainbow of lip colours. I think the key with MAC is you have to be comfortable wearing a matte colour and sometimes they can be quite drying.

I recently purchased the lip conditioner by MAC and it's really helping me. It cost €14.50 and you apply it onto your face when you apply your moisturiser. It needs that amount of time to really soak into your lips and then the matte lip colours sit much better and longer on your lips.

Choosing a matte or high shine lipstick can be difficult so sometimes it is better to have a make up look in mind and ask a beauty consultant which they would recommend. Lipgloss is not my most favourite possession as I just feel it always sticks in my hair when I'm out. I do sometimes use a gloss over my lipstick which is a cheap and cheerful way of creating a third colour so buy your lipstick and gloss in slightly different colours.
Lining your lip is really important and it can also help the lip colour stay on longer. I have two lip liners from MAC but they are quite expensive so I now buy Catrice Lip Liners, Collection 2000 and Essence. I am hoping to try out some sleek liners soon I think the colours are fantastic. To line your lips correctly, always use a sharp liner pencil, blunt pencils will just create a thick messy line. Start from the outside and work your way in towards your cupid bow. Be sure to give yourself a striking triangle and if you don't have the boldest of lips, line them slightly higher than your actual lip and when you apply the lipstick it will create a fuller lip.
Applying lipstick using a small lip brush is the best option. When you use a bullet (that's what they call the lipstick itself so I've heard) it can sometimes appear messy. Applying with a small brush working from the outside in again can create a flawless lip and make sure to go right into the outer edges of the lips. You don't want to smile and begin to speak and have missing lippy ladies.
 Some other brands which I love for lipsticks are once again Catrice. So far I have three colours, a pink (Frozen Rose), a nude (Be Natural) and a red (My Red Card) and I love them all. They are high shine, moisturising and great value at only 5.99.
Another fantastic range is Sleek. I have a beautiful berry red colour (Vamp) and two bright pout paints. Now pout paints are not for the faint hearted, you have to be ready for people to comment because these babies are bright! The colours I have are purple (Mauve Over) and orange (Lava).


Lips can be your defining feature in a make up look with just lashes and liner so go get brave ladies try some new colours soon and let me know how you get on.
Stay Beautiful,
Emma x
Follow me on Twitter: @emmajcsheehan
Instagram: Emma Sheehan emmalvsapose
Email: emmajosephinesheehan@gmail.com
Monday, 28 October 2013
Finding Foundation.... Nightmare at times!!
Ladies....
Have you ever seen an add for a new foundation and thought 'yeah that will absolutely suit me?' Well I do that each and every time, save like a good thing and then purchase the latest must have!
Sounds great I know... the only problem is... I'm discovering lately thanks to some expert advice that not all foundations are going to suit me, that in fact the wrong shade or wrong consistency can actually look worse than not wearing make up at all!
This is my current foundation collection.....

Huge amount of products as you can see and unfortunately it takes, setting powder on hand to keep some of them looking well on me all day. I have combination skin, I'm not sure if I didn't notice as much before or if my skin is changing in the last year or two but I am starting to look closer at my foundation than ever before.
I would love to be able to suggest to each of you a splash out product and a cheaper version that I can guarantee a feel good face all day but I can only speak from my own experience and hope that some of you match my complexion.
For a night out, full coverage look I always feel you cannot
 go wrong with MAC Studio Fix foundation. I currently have studio fix in 3 different shades due to tanning and it never lets me down. It is an absolute full coverage make up that will last night whole night. Now as stated before, I do have an oily t-zone so I would keep an eye on my complexion during the night and bring out a translucent powder to keep away the shine. These powders do not at all have to be expensive, I really like the Catrice pressed powder.
I am currently on the hunt for a day time makeup mattes itself, I tested the Bobbi Brown Skin Foundation at the weekend and I really think it will be added to my Christmas list, I loved how it felt all day and I didn't see it move which I love!
Back to what I have now as opposed to what I want haha :) Estee Lauder Double Wear has been my go to foundation for years. It's quite expensive so I cannot buy it all the time but thankfully another product I feel gives the same coverage is the Collection 2000 Lasting Perfection Foundation. I recently purchased a bottle of the Collection 2000 foundation for only €5.99 in Boots. I am not sure how long this offer is on for but if you need a go to bottle get down to Boots as soon as you can :)

Lasting Perfection is a great coverage foundation but again my oily t-zone gives me awful trouble with this foundation. Again a pressed powder keeps me on top of the oil situation but as with many women these days, we do not have the €35 for each bottle of foundation we want so invest in a pressed powder such as Catrice of possibly even MAC pressed powder for around €20 and then you can work away using a less expensive foundation and you get more value for money.
 Lighter liquid foundations are not something I have thought about before trying the Urban Decay Naked Foundation and the MAC Face and Body Foundation. I began to panic a little the first time using both of these foundations because I felt the coverage was shocking. I applied both of these with a stippling brush, which I then found didn't work for me at all. I took to my trusted Real Techniques expert face brush and I was much happier with the application. For these lighter foundations, I tended to apply a double layer, one brushing on the product and then going back in with a dabbing motion to ensure a fuller coverage. Naked foundation is one of my most popular day time picks.
Mineral Foundations; here you can see my Glo Minerals and Bare Minerals powder foundations. I actually first purchased my Glo Minerals Foundation to apply over the Naked Foundation to wear as a night time look. The Bare Minerals Starter Kit was then purchased in Debenhams in Waterford and I love the product. I have already given the kit a full blog post so feel free to return to that to discover if the brand is for you. I have started trying the mineral foundations on their own now and I like the coverage for nipping out of the house, not a full face application. It hides my blemishes and dark circles (which I am not impressed at finding) but still light enough to just give a healthy glow.

This has been a whirlwind of products on tonight's blog but I feel foundation is quite like a pair of jeans, so hard to find the perfect one but when you do, you will never give it up. If you ever want to try out a foundation please do approach the girls on the counters, they are so helpful and recently a great example of a good sales woman told me straight that her brand of foundation would not help my skin, this sounds crazy but instead she showed me a wonderful primer I am certainly hoping to get on my next payday which she said will help any foundation I wear, matte and last longer on my face. Now after seeing the amount of foundation I actually own at the minute, it'll be a great investment for me and keep me away from buying foundation for a while yet :)
If you have any questions relating to anything on tonight's blog please email me @ emmajosephinesheehan@gmail.com
Don't forget to follow me on twitter; @emmajcsheehan
Instagram: Emma Sheehan emmalvsapose
And also don't forget to follow the blog on Bloglovin (the link is along side the page here)
Stay Beautiful,
Emma x
Have you ever seen an add for a new foundation and thought 'yeah that will absolutely suit me?' Well I do that each and every time, save like a good thing and then purchase the latest must have!
Sounds great I know... the only problem is... I'm discovering lately thanks to some expert advice that not all foundations are going to suit me, that in fact the wrong shade or wrong consistency can actually look worse than not wearing make up at all!
This is my current foundation collection.....

Huge amount of products as you can see and unfortunately it takes, setting powder on hand to keep some of them looking well on me all day. I have combination skin, I'm not sure if I didn't notice as much before or if my skin is changing in the last year or two but I am starting to look closer at my foundation than ever before.
I would love to be able to suggest to each of you a splash out product and a cheaper version that I can guarantee a feel good face all day but I can only speak from my own experience and hope that some of you match my complexion.
For a night out, full coverage look I always feel you cannot
 go wrong with MAC Studio Fix foundation. I currently have studio fix in 3 different shades due to tanning and it never lets me down. It is an absolute full coverage make up that will last night whole night. Now as stated before, I do have an oily t-zone so I would keep an eye on my complexion during the night and bring out a translucent powder to keep away the shine. These powders do not at all have to be expensive, I really like the Catrice pressed powder.
I am currently on the hunt for a day time makeup mattes itself, I tested the Bobbi Brown Skin Foundation at the weekend and I really think it will be added to my Christmas list, I loved how it felt all day and I didn't see it move which I love!
Back to what I have now as opposed to what I want haha :) Estee Lauder Double Wear has been my go to foundation for years. It's quite expensive so I cannot buy it all the time but thankfully another product I feel gives the same coverage is the Collection 2000 Lasting Perfection Foundation. I recently purchased a bottle of the Collection 2000 foundation for only €5.99 in Boots. I am not sure how long this offer is on for but if you need a go to bottle get down to Boots as soon as you can :)

 Lighter liquid foundations are not something I have thought about before trying the Urban Decay Naked Foundation and the MAC Face and Body Foundation. I began to panic a little the first time using both of these foundations because I felt the coverage was shocking. I applied both of these with a stippling brush, which I then found didn't work for me at all. I took to my trusted Real Techniques expert face brush and I was much happier with the application. For these lighter foundations, I tended to apply a double layer, one brushing on the product and then going back in with a dabbing motion to ensure a fuller coverage. Naked foundation is one of my most popular day time picks.
Mineral Foundations; here you can see my Glo Minerals and Bare Minerals powder foundations. I actually first purchased my Glo Minerals Foundation to apply over the Naked Foundation to wear as a night time look. The Bare Minerals Starter Kit was then purchased in Debenhams in Waterford and I love the product. I have already given the kit a full blog post so feel free to return to that to discover if the brand is for you. I have started trying the mineral foundations on their own now and I like the coverage for nipping out of the house, not a full face application. It hides my blemishes and dark circles (which I am not impressed at finding) but still light enough to just give a healthy glow.

If you have any questions relating to anything on tonight's blog please email me @ emmajosephinesheehan@gmail.com
Don't forget to follow me on twitter; @emmajcsheehan
Instagram: Emma Sheehan emmalvsapose
And also don't forget to follow the blog on Bloglovin (the link is along side the page here)
Stay Beautiful,
Emma x
Friday, 25 October 2013
Brushes.... Tools of the Trade
Morning Ladies,
On this dull Friday morning, I think it's time we go back to basics and get to know our brushes!!
Brushes are the key to creating good make up looks. It's extremely difficult to to apply make up well if you are not using the right kind of brushes.
My own collection is growing slowly and as always it's important for me to clarify I am not an expert, what's working for me and my skin may not work for you and if you are in the make up business you may not agree but that's OK I'm always happy to spend more of my hard earned money on make up toys :)
Money is another huge factor as to what is available to you and ladies, I am right up there with you when it comes to brushes, I never invested hugely in my brushes because I didn't understand just how important they are.
A great brand and price point which I have sworn by the last few months are the Real Techniques by Samantha Chapman. I first came across these on Cloud 10 Beauty. I love this website!! They have a fantastic points reward system and when you sign up as a customer they are forever sending you discount codes which helps you to keep buying.
Now that Christmas is on the way it's time to get thinking about what we would like or what we would like to buy friends and family. The Real Techniques Core Collection is a perfect gift. It retails around €25 and Real Techniques are also available in Boots so if you do not like shopping online hopefully there is a Boots near you.

Another kit which again retails around €25 is the starter kit. I bought this with the intention of helping me create better eye make up and it is amazing. The brushes, I find, do not have overly long handles so you can get a good grip on them and really concentrate on what you are doing. It's extremely hard to learn a smokey eye look or to perfect liner when you have no tools so again treat yourself or someone else to this great kit sooner rather than later.

Foundation brushes... depending on what foundation you are using, a brush can either enhance the foundation or have you looking washy. Both the expert face brush and stippling brush from Real Techniques are an excellent choice. The expert face brush works so well with the Urban Decay Naked Foundation, MAC Face and Body Foundation, any foundation which is slightly lighter in consistency, this brush applies is flawlessly onto your skin. It costs €11.99 and is it always my go to brush. The stippling brush for me works best with my Estee Lauder Double Wear and MAC Studio Fix, retailing at €13.50 I love how you can create a flawless face with your full coverage foundation.


Other Real Techniques brushes I have invested in have been the blush brush at €11.99 and the powder brush €13.50. These are huge fluffy brushes and fantastic for blending out your contour lines and applying a light glowing blush.

That's a serious tribute to Real Techniques brushes but I genuinely feel they do not break the bank and with good care these brushes are going to last you ages.
If you were keeping an eye on the blog Facebook page last week " Emma Sheehan Blog" you would have seen me post about a brush sale in Fuschia Make Up. They had a 75% sale on their individual brushes so I invested in a few for me and some for my mum. I purchased two lip brushes, two blending brushes, a flat foundation brush and a small liner brush. You will not believe that for all 6 brushes it cost me €20!!! Postage was €6 and I am so happy they arrived. It's been a busy week in work for me but yesterday I managed to have a little play and I love them! The crease brush is fantastic, really suits my eye shape (gets right in there into the crease to help blending) They actually call their crease brush their blending brush so don't get too confused :) Fuschia make up have moved factory so they had a serious sale, please like them on Facebook "Fuschia Makeup" and keep an eye out over the weekend, they have said there will be amazing deals over the weekend so keep an eye out!

I actually called them yesterday looking for more brushes and the Swords store explained they will have brushes back in next Thursday so hopefully the will still be on sale :) 75% is a huge discount so I couldn't pass it up. You can do make up courses in both the Drogheda and Swords store Level 1 and 2, both during the week and weekends for €50. At the moment, they have an offer on in which you receive a brush kit at the course included in your price. I really want to go so hoping once I move to Dublin I'll duck over and do the courses.

My Bare Minerals brushes are naturally the best tool for my mineral make up. I bought the starter kit in Debenhams for €56. This kit includes 3 brushes which I have blogged about before but I love the full face brush for any of my powders or mineral foundations. I have recently been watching YouTube tutorials from people like Loz Curtis, I think she is fantastic! She made a great tutorial recently about what she feels is the right and wrong way to apply makeup. I had been putting mineral foundation over liquid medium coverage foundation but I'm starting to think that this is not working for me.

The smaller concealer brush from the Bare Minerals foundation is a lovely tool to make sure that areas such as your nose, chin and under the eyes get covered with the mineral make up.
I recently visited Emma at the Eyrebrushed Makeup Studio in Kilkenny. Emma has launched her own Eyrebrushed brush range. Emma very kindly gave me a brow/liner brush and it is fantastic!! When I get the opportunity to go back for a one day course I will be investing in more eye brushes from the range. The quality is fantastic and with all Emma's knowledge in the make up world, you know you're going to have this brush for years.

Any of the brushes mentioned in today's blog, I have only purchased within the last year. I completely understand that people these days do not have the money to purchase expensive brushes so if I can source brushes which work on all types of skin I will blog about them as I find them.
If I was loaded, of course I would like to own the MAC range of brushes but there are so many brands which can match MAC's quality these days. The lovely Paul from the Cosmetics Outlet in Dublin is launching his own range of brushes in November and I will absolutely be trying them! Madison is the brand and with Paul's knowledge of the make up world, I just know they will be unreal. Keep an eye out and like the "The Cosmetic Outlet Dublin 8" on Facebook to see the amazing offers he has in store and online.
I do have one MAC brush which I have now had for almost 4 years and I still love it. I have the Duo Fibre Large Stippling Brush and with good care, I still love to use this brush for my nights out with my full coverage foundation. Don't be silly like me ladies, about 3 years ago, I took the notion to buy a 'MAC' Brush Set on Ebay.... It cost me only €30 and I somehow believed it might have been real. Now please don't get me wrong my fake brushes are fantastic! I think I got an excellent set and it was really only in the last year and a half of getting into make up that I even realised they may not be real. The eye brushes I find really good but the face brushes are a little too rough for my skin.


Oh and just as I finished writing this the postman arrived with my bursh belt I had ordered online.... Delighted!!

If you have any questions on brushes please feel free to mail me at emmajosephinesheehan@gmail.com. Like my facebook blog page 'Emma Sheehan Blog' and follow me on Twitter @emmajcsheehan and instagram EMMALVSAPOSE.
Stay Beautiful,
Emma x
Subscribe to:
Posts (Atom)